Categories Electrical Wiring, Residential, Safety

Am I Using Too Many Extension Cords?

too many extension cords

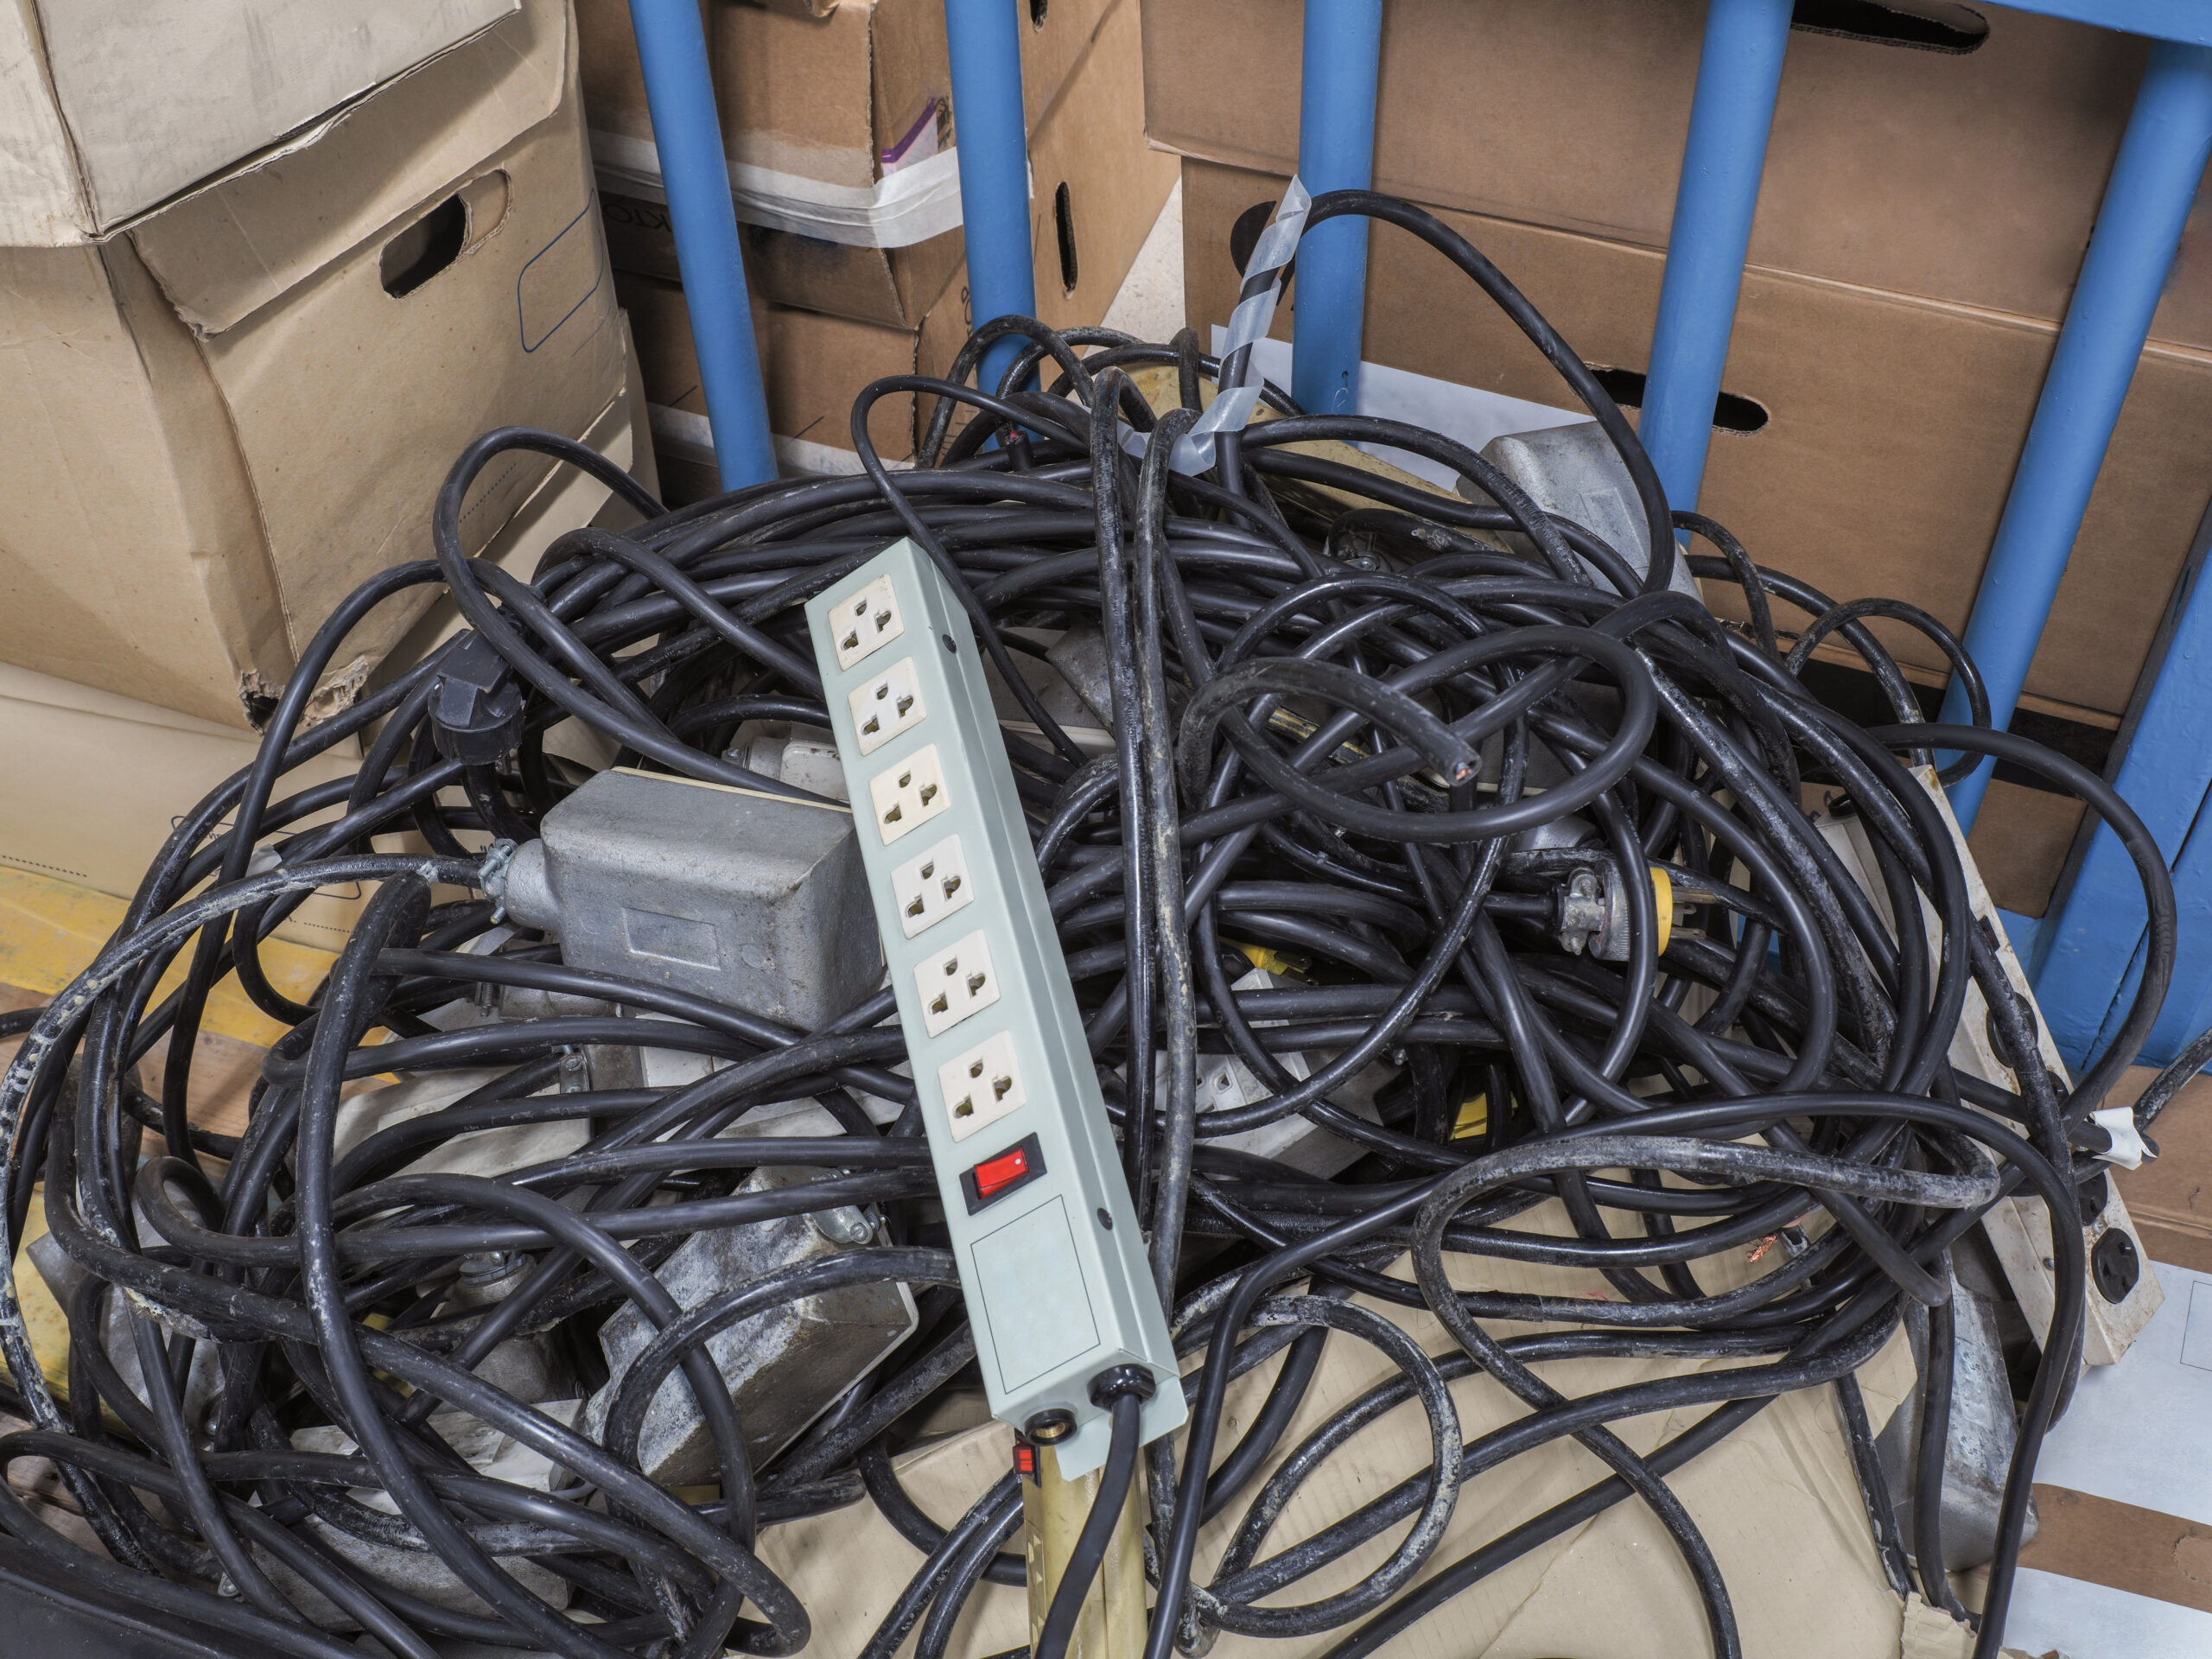
How many is too many extension cords? This question has 2 scenarios and two answers:

1. If your extension cord won’t reach, and you stretch its length by attaching another extension cord, that’s too many. Extending the length this way can result in overloading and overheating; then you have a fire risk. Buy one cord that is the correct length rather than daisy-chaining.

2. How many extension cords per room is too many? Extension cords are supposed to be a temporary solution, never a permanent one. Any room using even one extension cord as a long-term power source is already using too many extension cords. Extension cords aren’t designed to be used for more than 90 days.

Even though outlets have two plug-ins, never plug two temporary extension cords into one outlet. The power pull can be dangerous. Electrical resistance is higher with the addition of one extension cord. Connecting two extension cords or plugging two into one outlet results in heat generation that poses a fire risk.

Using Too Many Extension Cords Is Dangerous

OSHA regulations apply to workplaces and not necessarily homes. But their guidelines have set our standards for safety. Also, we’re spending much more time working in offices and managing small businesses at home.

Extension cords are terrific solutions to temporary power supply needs. Some of their recommendations for extension cord safety include:

  • Always choose cords with 3-prong plugs. Never remove the grounding plug to force a 3-prong extension cord into a 2-prong plug-in.
  • Cords should be approved for their intended use. For example, don’t use indoor cords outdoors, small (thin and flat) extension cords for large tools or appliances, etc. Every extension cord should have the right voltage rating and the amperage required to power the equipment/appliance.
  • Do not daisy-chain extension cords. Do not use more than one extension cord per outlet.
  • Don’t bend or coil cords.
  • Don’t place cords in areas that may get wet or damp.
  • Extension cords should not be extended through doorways, walls, or windows. They should not run under rugs or furniture.
  • For outside applications, use only outdoor cords.
  • If an extension cord feels warm to touch, unplug and stop using it.
  • If an extension cord has cuts or frayed wires, discard it.
  • Never attach extension cords to floors or surfaces using nails, tape, or staples.
  • Never use extension cords as a permanent power source.
  • Protect extension cords from foot traffic; protect pedestrians from tripping over extension cords.
  • Purchase cords that have been tested and approved by Underwriters Laboratories (UL), Intertek (ETL), or Canadian Standards Association (CSA).
  • The cords’ sizes are numbers; gauges. The smaller the number, the greater the amount of electrical current. Even if two cords have the same gauge, the shorter one can manage more current than the longer one.
  • Unplug extension cords after use. To unplug the cord, pull on the plug, not the cord.

The Solution: Adding More Outlets

Power strips and surge protectors are great solutions for connecting multiple electronics to one outlet. Extension cords are used to connect the distance between one outlet and one electronic appliance or piece of equipment. Using too many extension cords is dangerous.

If you’re using numerous power strips and extension cords to power your home or office, the problem is you don’t have enough outlets to support your electrical requirements.

The ideal fix is for your local electrical contractor to install additional outlets. Your electric professional will use the right type of wiring and make sure your circuit breaker can handle your current load.

Turn It On Electric is a 5-star, licensed, electrical contractor. We specialize in Phoenix-area commercial and residential electrical remodeling. If you need electrical upgrades that would increase your property value and make your home safer, request a free quote.

We welcome your questions. Contact TIO Electric.

Categories Electrical Wiring, Electrician, Residential, Safety

Steps to Take After a Failed Home Electrical Inspection

electrical inspection

If you’ve recently undergone a home electrical inspection and were notified that your home was not up to code, there’s no need to panic. However, there are some crucial steps to take to ensure the safety of your home and loved ones, while at the same time addressing any issues to get your home back on track to meet all the required safety standards.

In this article, we’ll explain what steps to take after a failed electrical inspection so that everything goes smoothly from that point forward.

  1. Understand the Findings: The first step is to carefully review the inspection report and understand the specific areas that failed to meet the requirements. The report should provide a detailed explanation of the issues and recommendations for resolving them. If there are any terms or concepts you don’t understand, don’t hesitate to seek clarification from a licensed electrician or inspector.
  2. Hire a Qualified Electrician: To address the problems identified in the inspection, it’s crucial to hire a qualified electrician. Look for a reputable electrical contractor who is licensed, insured, and experienced in residential electrical work. They will have the expertise to accurately assess the issues and provide effective solutions. Of course, we at Turn It On Electric would be happy to assist with any of your electrical needs in a situation like this
  3. Prioritize Repairs: Once you have chosen an electrician, work with them to prioritize the repairs. Some issues may require immediate attention due to safety concerns, while others may be less urgent. Discuss your budget and timeline with the electrician to develop a plan that suits your needs. By addressing the most critical problems first, you can ensure the safety of your home while managing the costs effectively.
  4. Obtain Multiple Quotes: It’s always a good idea to obtain multiple quotes from different electricians before proceeding with the repairs. This will give you a better understanding of the costs involved and help you make an informed decision. Remember, the cheapest option may not always be the best, so consider the electrician’s reputation, experience, and customer reviews alongside the price. Take a few minutes to learn the most important questions when hiring an electrician.
  5. Schedule the Repairs: Once you have chosen an electrician and received a quote, schedule the repairs at a convenient time. Depending on the complexity of the issues, the repairs may take a few hours or several days to complete. Be prepared to make alternative arrangements during the repair process if necessary, such as temporarily relocating to another part of your home or staying with a family member or friend.
  6. Retest and Obtain Certification: After the repairs have been completed, request a reinspection to ensure that all the issues have been resolved. Once your home passes the reinspection, you will receive a certification stating that your electrical system meets the necessary safety standards. This certification is important, as it may be required for insurance purposes or when selling your home in the future.

As you navigate through the process of addressing the failed electrical inspection, it’s essential to remember that your safety and the safety of your family should always be the top priority. By promptly addressing any electrical issues and working with qualified professionals, you can ensure a safe and secure home environment.

Remember, electrical inspections are crucial for identifying potential hazards and maintaining the integrity of your electrical system. To further expand your knowledge about electricity and electrical safety, visit the Electrical Safety Foundation International (ESFI) website (link: https://www.esfi.org/). They offer a wealth of resources and information to help you stay informed and make informed decisions about your home’s electrical system.

In conclusion, a failed electrical inspection is not the end of the world. By understanding the findings, hiring a qualified electrician, prioritizing repairs, obtaining multiple quotes, scheduling the repairs, and retesting the system, you can successfully address the issues and ensure the safety of your home. Take action promptly, and soon your electrical system will be up to code. If you need help or advice along the way, feel free to contact TIO Electric

Categories Electrician

5 Things To Do Before You Call an Electrician

Call an Electrician

When you contact tech support for help with your laptop or iPhone, the first thing the specialist asks is, “Did you turn it off and turn it back on?” If an electrical appliance or a light fixture is problematic, that’s the first thing you do before you call an electrician. Turn it off and turn it back on. If there are no signs of danger (burning, etc.), unplug it. Plug it back in.

Here are 5 additional steps to take before you call an electrician.

1. Troubleshoot the Outlet Before You Call an Electrician

The most frequent electrical issues are problems with outlets. To troubleshoot an outlet that isn’t working:

  • Check the circuit breaker – A tripped breaker will probably show the switch halfway between off and on. Flip it to the off position and reset the breaker, then flip it back on. If you see signs of visible damage, the breaker box is warm to the touch, or you smell burning wires, turn the breaker box off. Call an electrician.
  • Check the fuse box – Common signs of blown fuses are discoloration and melting. Be sure to use the right fuse to replace the blown fuse.
  • Examine the outlet itself – It’s not uncommon for an outlet to burn out. If you see signs of discoloration around the outlet, a small fire may have occurred. This is dangerous and it’s time to call an electrician to replace the outlet.
  • Flip a switch – A half-hot outlet is one in which one plug is always on but the other plug-in only works if you flip a nearby light switch.
  • Reset the GFCI – Ground fault circuit interrupters are designed for safety. If a GFCI outlet detects a power surge or short, it can shut itself off to protect you. There are two buttons located between the plug-ins. The red button is the reset button. Push it to get the outlet working again.
    The black button is a test button. To check that any GFCI outlet is working properly, push the black button. The plugged-in appliance should turn off, so then you reset it. If you press the black button and the appliance doesn’t turn off, there’s a problem with your GFCI outlet and you should call an electrician.

2. Check the Appliance, Electronic

Your problem may not be with your home’s electrical system. The obvious thing is to make sure your appliance or electronic is securely plugged in. If it is, unplug the non-working appliance and plug another into the outlet. If the outlet works fine with another device, it’s not an outlet problem.

If it’s a light or lamp, it could be the bulb. Years ago, you could visually spot a blown lightbulb. To check it today, you’ll need to insert a new lightbulb. If the new bulb doesn’t work, check it by inserting it into another fitting. If it works in another fixture, it’s time to call your electrician.

3. Problematic Power Outages

When your neighborhood loses power, you simply wait it out or revert to whole-house generator power. But if it’s just your house, check the circuit breaker. It has a safety switch. If it’s flipped off, reset it. If it keeps tripping, there’s a problem with the electrical circuitry or the panel itself. If your home has a fuse box, it can be several issues. (Call an electrician and consider upgrading to a circuit breaker box with protective safety switches.)

4. Feel The Walls

If you have any electrical outlet or switch problems, feel the walls around the area. If the nearby wall feels warm to the touch, this is an electrical emergency.

5. Unplug

Most new homes today can accommodate the additional electrical demands, but not-that-much-older homes can be overwhelmed by power requirements. Let’s say every member of the household is plugged-in, charging, washing/drying, the dishwasher is running, all lights are on, and your hairdryer blows the circuit. Your power outage can be managed by unplugging a few things. Later, ask your electrician what can be done to safely manage and eliminate power overloads.

Any time you have questions about home electrical problems, contact Turn It On Electric.

Categories Electrical Wiring

Do I Need an Electrician To Move an Outlet?

move an outlet

Most electrical outlets last between 10-25 years, but they don’t last forever. Badly installed or problematic outlets can need replacement in just a few years. During renovation projects, it’s not uncommon to move an outlet.

Electrical work is rarely simple. And without electrical experience, it can be dangerous. You can install or move an outlet in your home if:

  • You have electrical training.
  • You understand your home’s circuitry.
  • You have the necessary tools and hardware.
  • You have very good medical and life insurance.

Understanding the basics will explain why you need an electrician to install or move an outlet.

What You Need To Know To Move an Outlet

A local electrician can usually relocate an outlet in about 40 minutes. To DIY (do-it-yourself) move an outlet, you need a lot more time. You’ll also need:

  • 14-2 Romex cable for an indoor outlet in a dry location
  • Blank outlet cover
  • Drill
  • Keyhole- or drywall-saw
  • Micro-ohmmeter
  • Outlet box w/swing-out mounting tabs
  • Outlet cover
  • Pencil
  • Screwdriver
  • Voltmeter
  • Wire cutters/strippers
  • Wire nuts
  • Wiring/cable with corrosion-resistant jacket (PVC is recommended) and wet-location rated conductors for outlets near showers/toilets

Some wires can’t be moved. Or the wiring may be fine but it’s too short for the new location. One of the biggest mistakes DIYers make is leaving old wiring behind a wall in a messy tangle. Always removed old wiring, even if it’s “dead to you.”

How To Identify Unsafe Outlet Wiring

Age is one way to determine if wiring is unsafe. Homes built in the 1930s vs. homes in the ’60s, ’80s… Just as technology evolves, electrical standards and practices change with time.

Something to look for when moving an electrical outlet is “backstabbing.” It’s a problem you don’t want to repeat. Backstabbing is when neutral wires’ ends are cut, and the insulation removed. The bare wires are then shoved into the back of the outlet.

Backstabbing electrical wires was commonplace in the 1970s and ’80s, but it’s a fire hazard and no longer used by professional electricians. Additional problematic home outlet wiring we encounter includes:

  • Knob and tube – This is the oldest home wiring and is often found in homes built before 1940. There’s usually a dirt buildup that makes it difficult to tell the difference between neutral and hot wires, and it’s likely ungrounded. This must be removed, not relocated.
  • Leaded sheathed – Homes built before 1950 may have lead-covered electrical wiring. It must be removed, not relocated.
  • Rubber-sheathed wiring – Rubber-insulated wiring was used in homes between 1950-1980. It crumbles and can be an arcing/fire hazard. If your home has this type of wiring, you should have annual electrical inspections. For remodeling purposes, it must be removed, not relocated.

Completing the Project: Moving an Electrical Outlet

The area to which your outlet is to be relocated must be carefully prepared. You must mark where you want the outlet installed and use the proper tools for cutting or positioning.

The final process for moving your outlet is to feed the wire through the wall mount. Snugly affix Phillips screws in each corner, then:

  1. Connect the wire to the outlet’s receptacle.
    • Black wire connects to the hot screw.
    • Copper wire connects to the ground screw.
    • White wire connects to the neutral screw.
  2. Secure the outlet in the cut-in box then install the cover plate.
  3. Screw a blank plate into the old electrical outlet.

Why You Need a Licensed, Phoenix Electrician

Arizona people value time and money. There are numerous internet DIY videos and processes, but the reality is, you need an electrician for electrical work.

  • TIO Electric is LEEDS-certified and State of Arizona-licensed.
  • You’ll save money if we find a potential or current problem. We can fix it now rather than return later and avoid another call-out charge.
  • We know Valley electrical codes and energy requirements inside out.
  • We understand your home’s electrical system and ways to safety-check every project. This includes knowing what kind of electrical load your home can handle.

We want you to know more about your home’s electrical system. When you know more, you’ll know to contact Turn It On Electric for electrical upgrades.

Categories Electrical Wiring, Residential

Should I Switch to Copper Wiring?

copper wiring

Copper wiring has been used in electrical home systems since the late 1800s. Other metals have been tried, but nothing has proven to be better for electrical conductivity and affordability than copper.

Electrical wiring metals can include:

  • Gold – Gold offers superior electrical conductivity. It’s durable and flexible as well as highly efficient. Because of its high cost, gold is usually used as a wire coating rather than the main conductor. This coating can increase conductivity in thin wiring.
  • Silver – Silver’s durability and flexibility make it a good choice as an electrical conductor. But it’s an expensive option and often difficult to find. Plus it oxidizes faster. This means silver wires will degrade faster than copper wiring.
  • Tungsten – This thin metal is strong and durable against heat and erosion. It has a very high melting point, which makes it acceptable for electrical wiring but is cost-prohibitive.

In the 1960s a copper shortage led to the use of aluminum wiring as a cost-effective option. We knew it wasn’t a better electrical conductor, so we used bigger aluminum wires. But bigger isn’t better when it comes to aluminum vs. copper wiring.

3 Problems: Aluminum vs. Copper Wiring

Almost immediately after replacing copper wiring with aluminum, problems arose:

  • Creeping – Aluminum wiring expands and contracts too much as it’s heated and cooled. This causes the wires to slip (“creep”) out of the screws holding them in place. This leads to loose connections and overheating.
  • Fragility – Even at thicker gauges, aluminum wires were easily crushed, cut, or dented. The damaged wire led to overheating.
  • Rust – When copper rusts, the surface oxide is also electrically conductive. When aluminum wiring rusts, the whitish oxide interferes with the electrical flow and causes overheating.

Make the Switch to Copper Wiring

Homeowner insurance experts say you should replace aluminum with copper wiring. They cite what’s called a “connection reach hazard,” which is an arc fault fire risk. Aluminum wiring in houses manufactured prior to 1972 is 55 times more likely to cause a fire. Some homes have combination aluminum-copper wiring, which is still a high-risk fire hazard.

If your home has aluminum or a combination of aluminum and copper wiring:

  • Buying a home with aluminum wiring is possible but it is strongly advised against.
  • Full disclosure is legally required for homeowners when selling a property with aluminum wiring.
  • You may be able to find insurance coverage but will likely pay higher premiums.

Pigtailing aluminum and copper wiring is legal but must be done by an experienced, licensed Arizona electrician. It should only be an option when copper rewiring is not financially possible and should be considered a temporary solution.

When To Call TIO Electric

Call Turn It On Electric immediately if you notice:

  • Burning smells from outlets or switches
  • Frequent circuit tripping
  • Lights flickering
  • Power surges/flickering lights
  • Smoke or sparks from switches or outlets
  • Warm electrical switches or outlets

…or any time you have a question about your home’s electrical wiring. Again, any type of home electrical rewiring should only be performed by a licensed electrician. Professional electricians will guarantee their work.

Turn It On electricians do not receive commissions, so we make our recommendations based on safety first, followed by practicality and affordability. We’ll also ensure you have complete information about your unique electrical situation. You’ll be able to make knowledgeable decisions.

Home technology and electrical demands will continue to increase. Electrical upgrades, especially replacement with copper wiring, keep your home safer and up-to-date. For more information, contact TIO Electric.