Categories Residential

What to Do When Your Smoke Alarms Keep Going Off

Smoke alarms are essential for home safety, alerting you to potential fires. However, when they go off continuously without apparent cause, it can be both annoying and worrisome. We’ll provide information to help you understand why this might be happening and what steps you can take before calling in a professional from Turn It On Electric.

Understanding Why Smoke Alarms Go Off

Smoke alarms can be triggered by various factors beyond actual smoke from fires:

  • Cooking vapors – Common in kitchens, especially if the alarm is near the stove or oven.
  • High humidity – Steam from bathrooms or kitchens can cause false alarms.
  • Dust or insects – Small particles or tiny bugs can interfere with the sensors.
  • Aging alarms – Older units may malfunction and need replacement.

Steps to Take Before Calling an Electrician

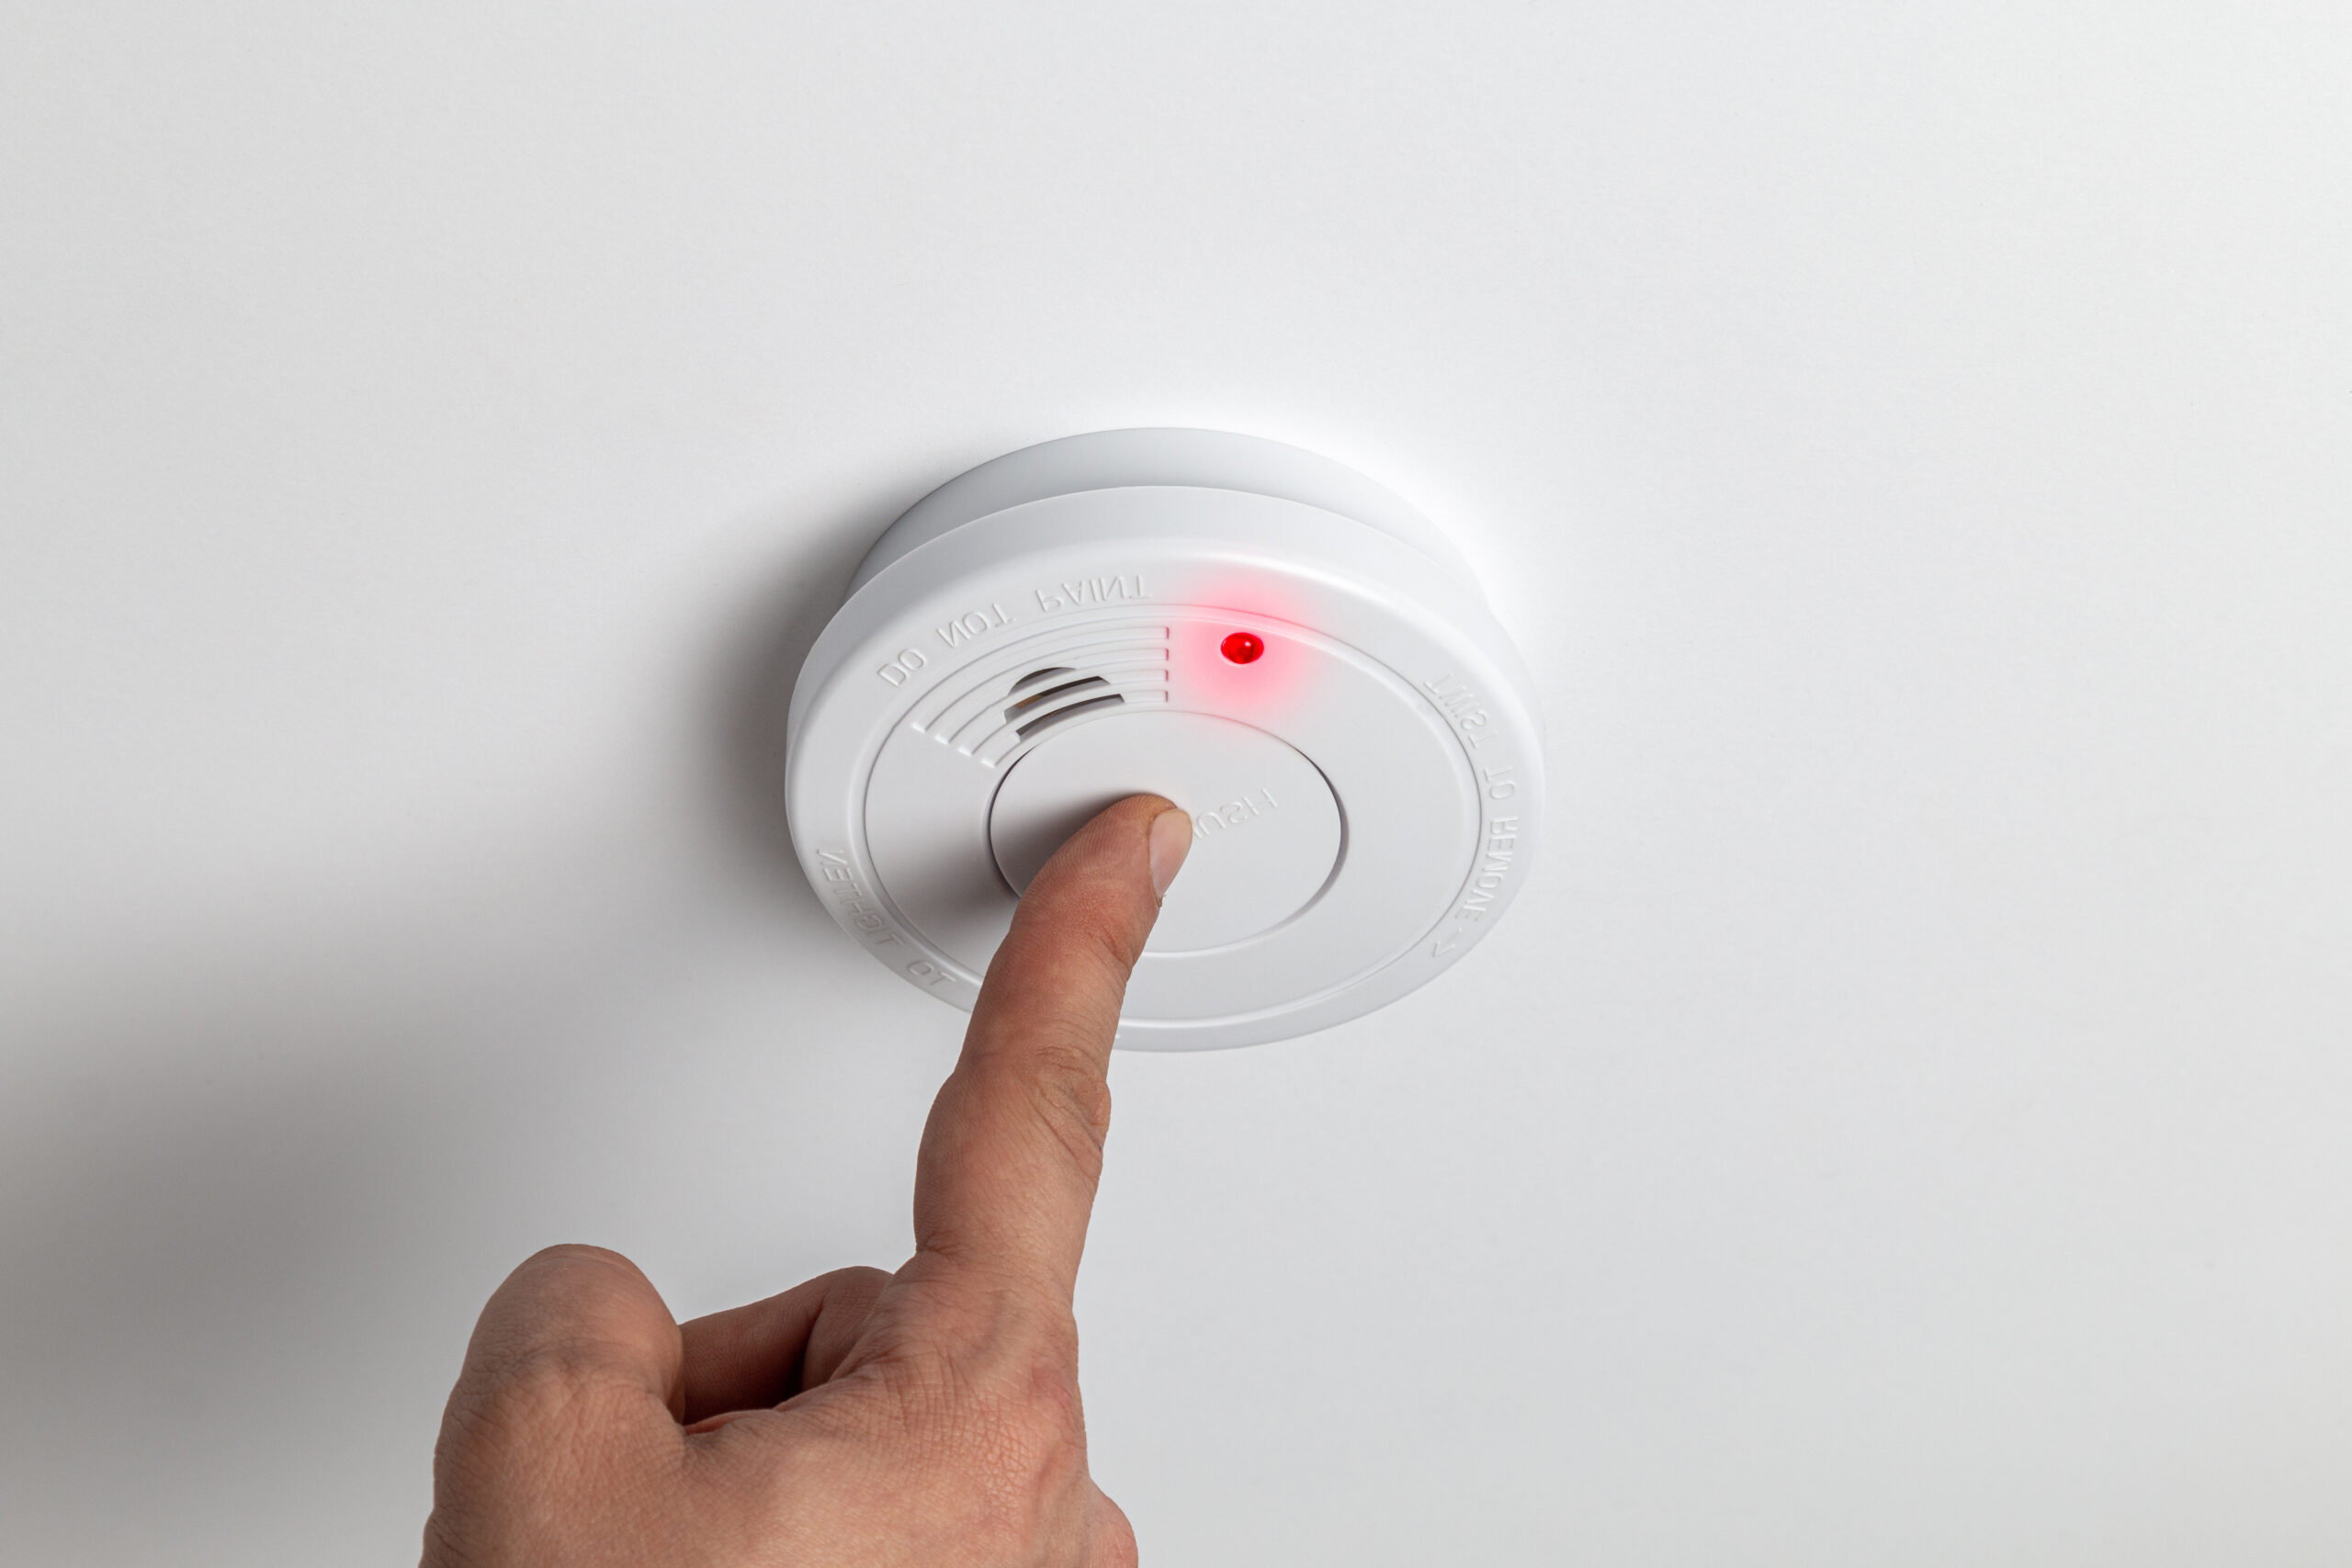
  • Reset Your Alarms: Try resetting the alarm by pressing the reset button. If it doesn’t have one, turning off the power at the breaker for a few minutes might help.
  • Clean the Alarms: Use a vacuum attachment or a soft brush to clean the sensor chamber. Dust, pollen, or spider webs inside can cause false alarms.
  • Replace Batteries: If your smoke alarm is battery-operated, replace the batteries to see if it resolves the issue.
  • Relocate the Alarm: If false alarms are frequent and triggered by cooking or steam, consider moving the alarm to a slightly different location.
  • Check for Expiry: Smoke alarms typically need replacement every 10 years. Check the manufacture date on the back of your device to see if it’s time for a new one.

When to Call Turn It On Electric

If you’ve tried the above steps and your smoke alarms continue to sound without reason, there may be a deeper electrical issue. When installing new alarms or replacing old ones, professional installation ensures they are correctly wired and located for optimal safety.

Persistent issues with smoke alarms can be disruptive and distressing. By taking some preliminary steps, you may be able to solve the problem yourself. However, for installations, electrical concerns, or when DIY solutions don’t cut it, the experts at Turn It On Electric are here to help.

Is your smoke alarm still giving you trouble? Contact Turn It On Electric for a comprehensive check and expert installation. Ensure your home’s safety systems are up to par, professionally installed, and working properly by the best in the business.

Categories Residential

Powering Up at Home: EV Charger Installation

With the surge in electric vehicle (EV) ownership, having a home charging station is becoming increasingly essential. Installing an EV charger not only provides the convenience of charging your vehicle at home but also enhances your property’s value and supports sustainable living.

Why Install an EV Charger at Home?

Installing an EV charger at home offers numerous benefits:

  • Convenience: Charge your vehicle overnight and start each day with a full battery.
  • Increased Property Value: Homes with EV chargers are appealing to environmentally conscious buyers.
  • Environmental Impact: Reduce your carbon footprint by using your home’s electricity, potentially sourced from renewable energy.

Types of EV Chargers:

Understanding the different types of EV chargers can help you choose the right one for your home:

  • Level 1 Chargers: These use a standard household outlet and are best for overnight charging or smaller batteries.
  • Level 2 Chargers: Faster than Level 1, these require a dedicated 240-volt circuit and are ideal for all types of EVs.
  • DC Fast Chargers: While uncommon in homes due to high power requirements, they offer rapid charging times.

Choosing the Right Charger for Your Home:

Select a charger that complements your vehicle’s needs and your home’s electrical capacity:

  • Vehicle Compatibility: Ensure the charger matches your vehicle’s make and model.
  • Charging Speed: Consider how quickly you want to charge your EV each day.

Preparing for Your EV Charger Installation:

There are several things that should be taken into consideration before the technician arrives.

  • Location: Choose a practical location for the charger that is easily accessible to your EV.
  • Proximity to Electrical Panel: The closer the charger is to your main electrical panel, the simpler and less costly the installation.
  • Power Requirements: Verify that your home’s electrical system can handle the additional load, or plan for potential upgrades.

A certified electrician should handle the installation to ensure safety and compliance:

  • Safety Inspections: The technician will inspect your electrical system to ensure it can safely support the charger.
  • Installation: The electrician will install the charger, make all necessary electrical connections, and test the system.
  • Final Setup: Integration with home energy management systems if applicable.

Maintenance Tips:

Regular Inspections: Check the charger periodically for any wear or damage.

An EV charger is a significant upgrade that enhances your home’s functionality and its appeal in a rapidly evolving automotive market. With proper planning and professional installation, you can enjoy the full benefits of EV ownership.

Ready to install your home EV charger? Contact Turn It On Electric for expert installation services that ensure safety, efficiency, and reliability. Let us help you make the most of your electric vehicle.

Categories Residential

Best Practices for Lighting and Fixture Installations

Lighting not only brightens spaces in our homes but also enhances aesthetic appeal and functionality. Whether you’re considering a chandelier for your dining room or modern sconces for your hallway, the right fixtures can transform your living environment. However, proper preparation is key to ensuring the installation process is smooth and efficient.

Choosing the Right Fixtures

Selecting the right lighting fixtures is more than just about style; it’s about compatibility and placement. Here are a few considerations:

Scale and Proportion: Ensure the size of the fixture is appropriate for the space. For example, a large pendant light might overwhelm a small room, while a tiny sconce could get lost in a large area.

Style Compatibility: Choose fixtures that complement the existing decor of your home to create a cohesive look.

Functionality: Consider the primary function of the fixture. For instance, task lighting for a kitchen island or ambient lighting for a cozy living room.

Pre-Installation Preparation

Being well-prepared can significantly ease the installation process:

Fixture Selection: Have your fixtures selected and purchased before scheduling the installation. This ensures the electrician knows exactly what they’re working with and can prepare the necessary tools and components.

Electrical Requirements: Check if your new fixtures require specific types of bulbs or if they have particular voltage requirements that might necessitate adjustments to your home’s electrical system.

Assessing Your Space

A quick assessment can help identify any potential installation challenges:

Installation Area: Examine the area where the fixture will be installed. Look for access to electrical connections and ensure there is enough space for the installation.

Ceiling Strength: Particularly for heavy fixtures, it’s important to ensure that your ceiling has the right support. If unsure, this is where a professional can provide guidance.

When to Call a Professional

Some installations can be straightforward, while others might pose significant challenges:

Complex Wiring: If the fixture requires wiring that goes beyond simple replacement, it’s safer to rely on a professional.

Safety Concerns: Handling electrical wiring involves risks, particularly in older homes or with complex systems. Professional installers can ensure that all work is up to code and safe.

Installing new lighting fixtures can dramatically improve the look and feel of your home. By choosing the right fixtures, preparing effectively, and knowing when to call in the experts, you can ensure that your home lighting project is successful and stress-free.

Are you ready to brighten up your home with new lighting? Contact Turn It On Electric for expert advice and professional installation services. Let us help you make your home shine!

Categories Residential

What to Expect When You’re Upgrading Your Electrical Panel: Costs, Process, and Tips

Upgrading the electrical panel in your home is not just a matter of convenience; it’s a necessity for safety and efficiency in today’s technology-driven environment. Modern appliances and systems require a stable and sufficient power supply that outdated panels may not support. Recognizing the need to upgrade your electrical panel is the first step towards ensuring your home meets current electrical standards and provides a safe living space.

When to Consider an Electrical Panel Upgrade

Typical Lifespan of Electrical Panels: Most electrical panels have a lifespan of 20 to 30 years. However, the increasing demands placed on your home’s electrical system by modern appliances can shorten this lifespan. If your panel is older or you’re experiencing issues such as frequent breaker trips or flickering lights, it might be time to consider an upgrade.

Warning Signs and Symptoms of Failure: Besides age, other signs that indicate the need for an upgrade include:

  • Circuit breakers that frequently trip
  • Overheating electrical service conductors
  • Rust on the panel or the presence of an old fuse box
  • The addition of major new appliances that could strain the current system

Cost Overview

Upgrading an electrical panel can cost anywhere between $6,000 and $40,000. This price can vary based on the panel’s amperage and the complexity of the installation.

Factors Influencing Cost

Materials: Higher-amperage panels and premium brands cost more.

Additional Repairs: Sometimes, additional wiring, conduit repairs, or patching up the walls are necessary.

Saving Tips on Upgrades

  • Compare quotes from multiple licensed electricians.
  • Check if local rebates are available for energy-efficient upgrades.
  • Preparation Steps: Before the upgrade, ensure that your home is ready. This might involve clearing the area around the panel and confirming that the new panel will comply with local codes.

Main Stages of the Upgrade

  • Removal of the Old Panel: This includes safely disconnecting your home’s power supply.
  • Installation of the New Panel: Wiring the new panel while adhering to electrical codes and safety standards.
  • Inspection and Testing: Once installed, the system will be tested by your electrician to ensure everything is functioning correctly.

Professional Tips for a Smooth Upgrade

Choosing the Right Contractor: Always hire a licensed and insured electrician with good reviews and solid recommendations. Ensure they have experience with panel upgrades and are familiar with local codes.

Compliance and Safety Guidelines: Your contractor should handle all necessary permits and inspections. Adhering to these regulations is crucial for ensuring the safety and legality of your electrical upgrades.

Upgrading your electrical panel is a significant but vital investment in your home’s electrical safety and functionality. While the process involves considerable cost and preparation, the peace of mind and safety it brings are invaluable. Always rely on professional services to handle such critical tasks, as they ensure that the work is done efficiently and up to the standards required by your local regulations. Contact Turn It On Electric today to schedule for a complimentary estimate and ensure that your panel is in good hands!

Categories Residential

Ceiling Fan Installation and Troubleshooting

Installing a ceiling fan is more complex than it might appear. Professional installation is essential for ensuring safety, efficiency, and functionality.

Understand Your Installation Needs

Before calling an electrician, identify the type of ceiling fan you need, considering the room’s size and your aesthetic preferences. Having the fan selected beforehand, and in your possession, can save time and helps the electrician prepare for the specific installation requirements and specs.

Electrical Box and Power Concerns

One common issue that arises during ceiling fan installations is an inadequate electrical box. Electricians can assess if the existing box can support the fan’s weight and the vibrations it produces. Upgrading to a suitable box is crucial to prevent future problems.

Wiring and Switch Configuration

Electricians handle the complex wiring that involves integrating the fan smoothly into your home’s electrical system. They ensure that the fan and its switch are properly wired to your home’s power source, addressing any safety and functional issues that might not be evident to the untrained eye.

Troubleshooting Your Ceiling Fan

Before reaching out to a professional, there are a few simple checks you can perform if your ceiling fan is not working properly:

  • Check the Power Supply: Ensure the fan’s switch and the main circuit breaker are in the ‘on’ position.
  • Remote Control Issues: If your fan is controlled by a remote, replace the batteries to rule out a dead battery issue.
  • Inspect for Loose Connections: Sometimes, a loose wire in the switch or fan can be the culprit. If accessible and safe, check to ensure all connections are tight.

When to Call an Electrician

  • If the fan makes unusual noises or wobbles excessively, it could be an installation issue.
  • Persistent power issues after checking the circuit breaker might indicate more serious wiring concerns.
  • Any sparking or electrical odor is a clear sign to stop your checks and call a professional.

When You Might Not Need an Electrician

It’s important to note that while electricians handle all power and mounting issues, they typically do not troubleshoot remote controls or external devices not directly connected to your home’s electrical wiring.

For a safe and secure ceiling fan installation, professional help is invaluable. Electricians ensure that all components are correctly installed and meet all safety codes, which is especially important for high-powered devices like ceiling fans. Ready to enhance your home with a new ceiling fan? Contact Turn It On Electric today to ensure your installation is handled professionally from start to finish!